The connection in brief
Connect GitHub Copilot to your Dataverse environment by enabling the Copilot MCP client, adding your environment’s /api/mcp URL in VS Code, and signing in with your Microsoft work account. Then test the connection with a read-only request.
The steps follow the same route as the walkthrough: Power Platform admin center → Power Apps → VS Code. I use Global → Copilot Global for the connection. If you prefer a project-only setup, the configuration alternatives are included in step 3.
Before you start
- A Dataverse environment and a Microsoft account with access to it.
- VS Code with GitHub Copilot available and signed in. Your GitHub sign-in enables Copilot; the Microsoft sign-in gives it access to Dataverse.
- A Power Platform administrator who can enable the Copilot MCP client if needed.
- Your organization’s approval to use the environment through Copilot. Check applicable Dataverse MCP billing with your administrator.
MCP uses your Dataverse permissions; connecting does not grant extra access to tables or records. See Microsoft’s Dataverse MCP FAQ for permissions and billing.
1. Enable the Copilot client
Open the Power Platform admin center with an administrator account.
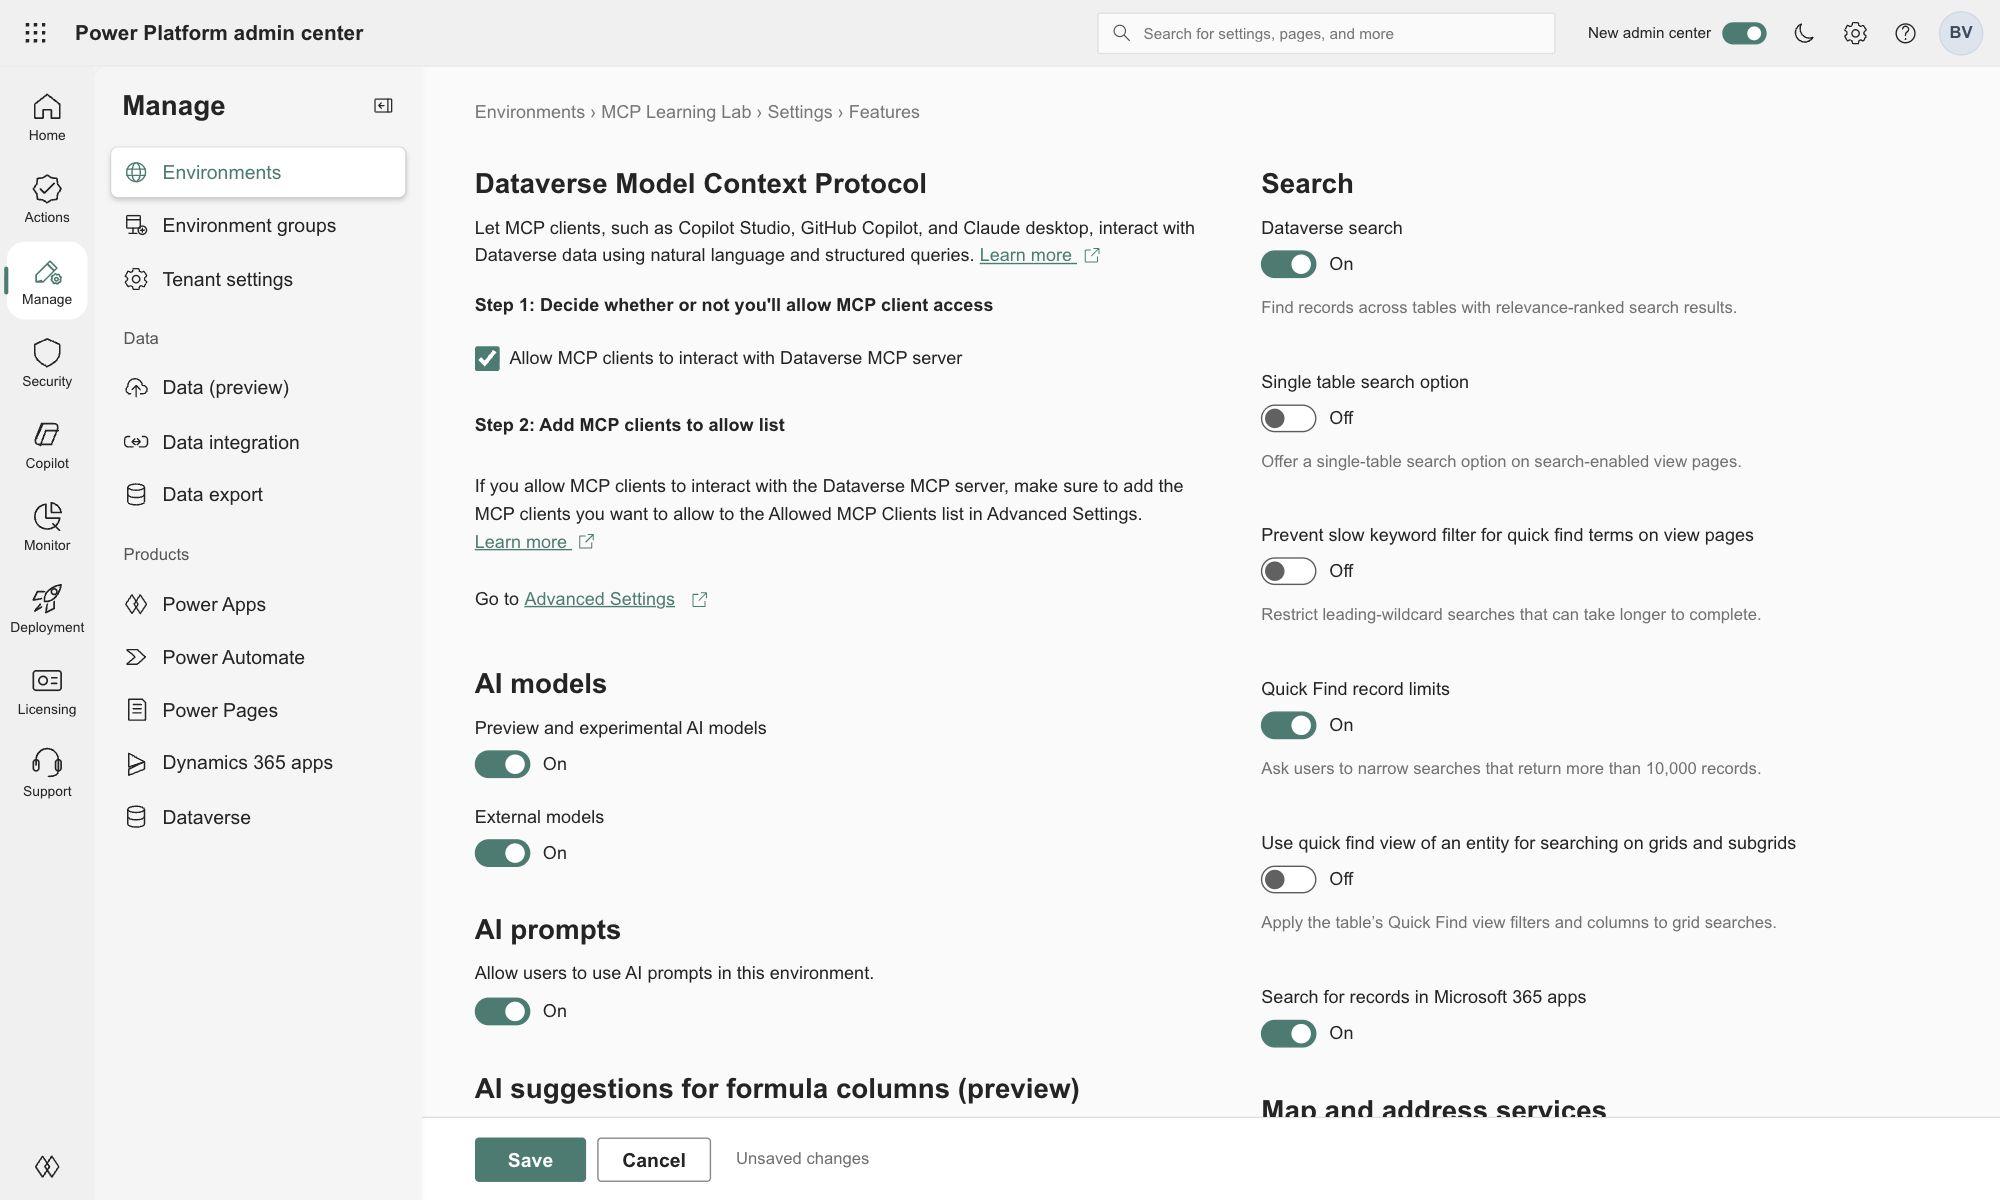
- Go to Manage → Environments, select your environment, and open Settings → Product → Features.
- Find Dataverse Model Context Protocol. Select Allow MCP clients to interact with Dataverse MCP server, then Save if you changed it.
- Open Advanced Settings. In Active Allowed MCP Clients, open Microsoft GitHub Copilot.
- Set Is Enabled to Yes, then choose Save & Close.
Checkpoint: both the environment setting and the Microsoft GitHub Copilot client are enabled. Enabling Copilot Studio alone does not enable GitHub Copilot. These controls are covered in Microsoft’s environment configuration guide.
I cannot change these settings
These settings require the Power Platform administrator role. Ask your administrator to enable Microsoft GitHub Copilot for the specific environment you need. The client allowlist permits the connection; your Dataverse security roles still determine which operations you can perform.
2. Find your Dataverse MCP URL
Switch to Power Apps and select the same environment. Open the Settings gear → Session details, then copy Instance URL. Remove a trailing slash and append /api/mcp once.
Instance URL
https://YOUR-ENVIRONMENT.crm.dynamics.com

MCP server URL
https://YOUR-ENVIRONMENT.crm.dynamics.com/api/mcp
Keep your regional hostname exactly as copied—for example, crm8.dynamics.com. Use the Instance URL, rather than an app link containing /main.aspx or a Web API endpoint containing /api/data/v9.2.
Checkpoint: your URL starts with https://, points to the intended environment, and ends in /api/mcp. This is the address used in Microsoft’s VS Code connection steps.
3. Add the server in VS Code
Open VS Code with GitHub Copilot signed in.
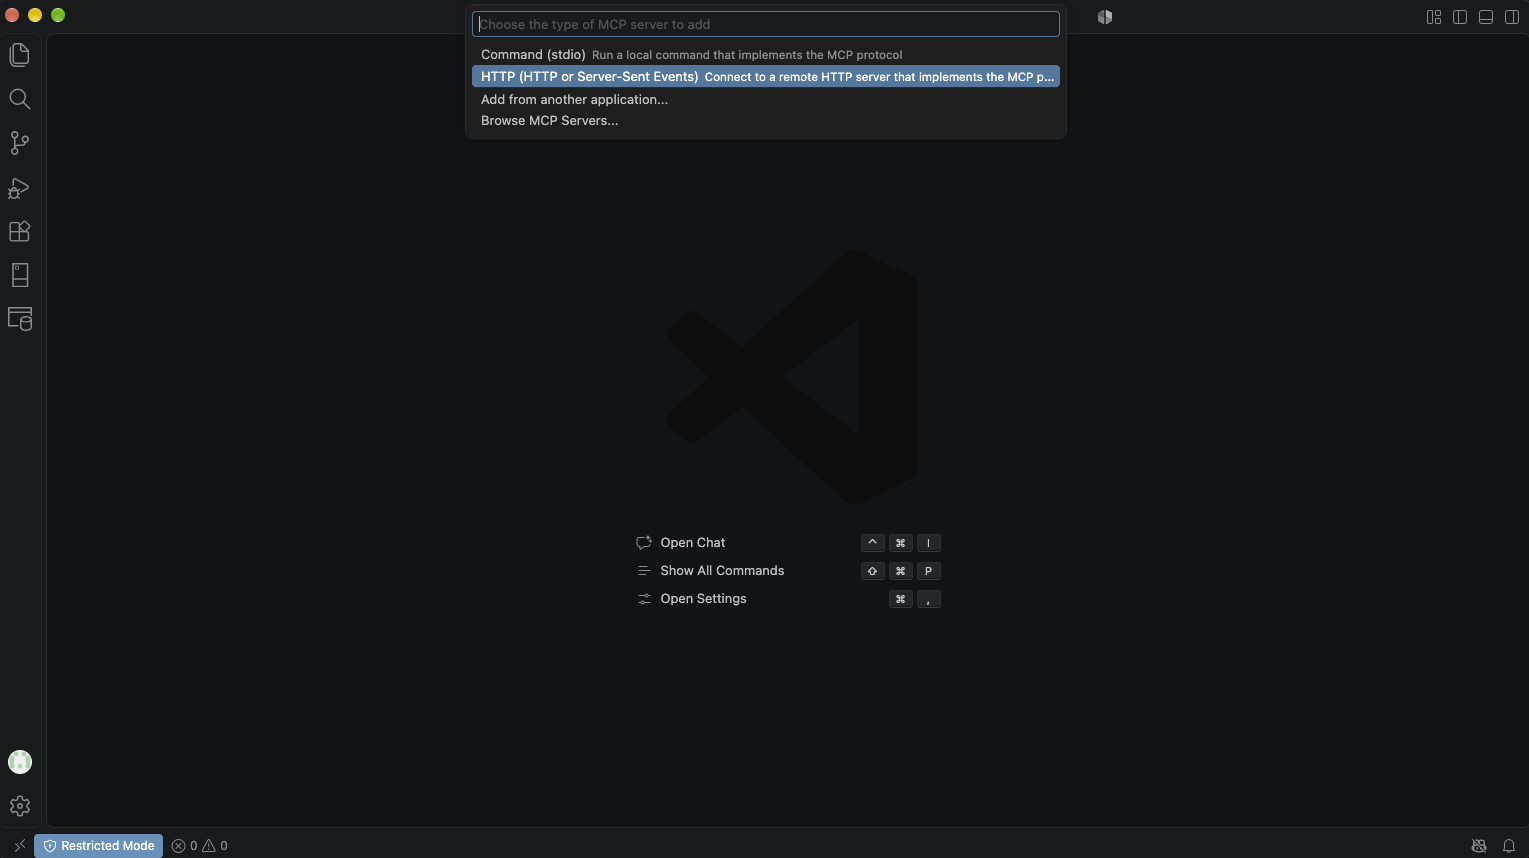
- Press ⌘⇧P on Mac or Ctrl+Shift+P on Windows/Linux to open the Command Palette. Run MCP: Add Server….
- Select HTTP—shown as HTTP (HTTP or Server-Sent Events) in my screenshots. The URL you enter still uses HTTPS.
- Paste your MCP URL and press Enter.
- Give the server a recognizable name, such as DataverseMcp, and press Enter.
- Choose Global, then Copilot Global when the destination picker appears. This makes the connection available across your projects.
The generated configuration for this route uses mcpServers. Check that it contains your server name and environment URL, then save any edits.
{
  "mcpServers": {
    "DataverseMcp": {
      "type": "http",
      "url": "https://YOUR-ENVIRONMENT.crm.dynamics.com/api/mcp"
    }
  }
}
Replace the example hostname. If the file already contains other servers, add only the new entry inside its existing mcpServers object.
See the HTTP option in VS Code
Global or workspace? Which configuration file should I use?
Choose global scope to reuse the connection across projects, or workspace scope to keep it with one project. VS Code’s destination options depend on its version and selected agent harness.
| Destination | File | Top-level key |
|---|---|---|
| Copilot Global, as shown in the walkthrough | ~/.copilot/mcp-config.json by default |
mcpServers |
| Copilot workspace | .mcp.json at the project root |
mcpServers |
| VS Code workspace format | .vscode/mcp.json |
servers |
If COPILOT_HOME is configured, Copilot’s user configuration lives there instead of the default ~/.copilot directory. Use the destination shown by your client. The VS Code configuration reference explains the supported formats.
For .vscode/mcp.json, use this shape:
{
  "servers": {
    "DataverseMcp": {
      "type": "http",
      "url": "https://YOUR-ENVIRONMENT.crm.dynamics.com/api/mcp"
    }
  }
}
Keep the key that belongs to your chosen format; do not paste mcpServers into a file expecting servers. You only need one connection for this setup, not a copy in every file. If the destination picker marks an older User Configuration option as deprecated, choose Copilot Global for the route shown here.
4. Sign in and enable the tools
Run MCP: List Servers, select the server you just named, and choose Start Server if it is stopped. If a trust prompt appears, check the linked configuration and choose Trust for your intended connection.
Microsoft sign-in can appear at either of these points:
- When the server starts: allow the Microsoft authentication request, choose the work account that has access to your environment, and complete any browser sign-in prompts.
- When you first ask Copilot to use it: select Authenticate on the MCP authentication required message, complete sign-in, then resume the request.
Already signed in? You may not see either prompt. You do not need to add another server just because authentication appears later.
Open Copilot Chat and use Agent mode, or the Copilot session with tools enabled in newer versions. Open the chat’s customization/tools control, select Tools, and expand your server under Connected Sources. Make sure the server and the tools you need are enabled.
Checkpoint: your server is running and its tools appear in the current Copilot session. The next step checks an actual request.
Trust, sign-in, and Allow Once are different prompts
Trust lets the MCP server start. Microsoft sign-in gives it access using your account. Allow Once approves the particular action Copilot wants to perform. Completing one does not automatically complete the others. Review the tool and its inputs before approving a request.
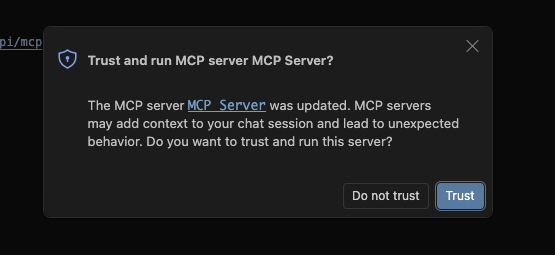
For workspace configurations, VS Code’s Workspace Trust can control startup instead of a separate server prompt. Only trust a workspace you have reviewed. See VS Code’s server trust guidance.
Find the tools button and inspect the connected server
In my screenshots, the four-tile icon beside the chat header’s plus button and dropdown opens the customization controls. Choose Tools, then expand Connected Sources → your server. Other versions place Configure Tools near the chat input.
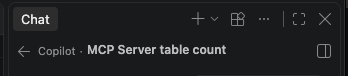
The screenshots use the name MCP Server; the walkthrough uses DataverseMcp. These are connection names I chose, not different Dataverse services. Look for the name you entered in step 3.
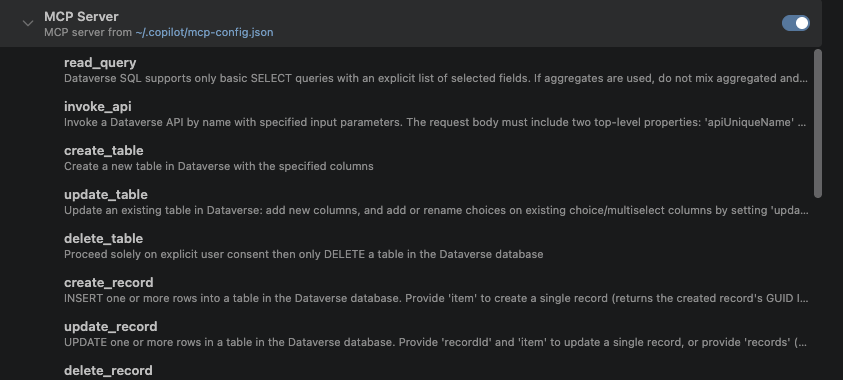
You can also run Chat: Open Customizations and select MCP Servers to manage the connection. See VS Code’s server controls.
5. Verify with a read-only request
Send this prompt in Copilot Chat. Replace DataverseMcp if you chose another server name.
Use the DataverseMcp MCP connection to find the Account table
and describe its logical name and available columns.
Use metadata tools only. Do not create, update, or delete records.
Show which tools you called and report any connection errors.
If Copilot asks for approval, inspect the requested tool and inputs, then choose Allow Once for the intended read. Expand the tool result and check that it came from your Dataverse server and describes the Account table. If Copilot answers without calling the server, the connection has not been tested.
You’re connected when a request to your intended server returns the expected table metadata. The number of tables or tools does not need to match the walkthrough.
Why my table-count test also asked to run a terminal command
In my setup test, I asked how many tables the server exposed. Copilot retrieved the table catalog with describe, then requested permission to count the returned entries using a local terminal command. That command was a separate action, not part of Microsoft sign-in or a requirement for connecting Dataverse.
Review each requested action. If you only want to check the connection, use the Account-table prompt above; you can also tell Copilot to use MCP metadata tools only and avoid local commands.
Once connected, follow my Custom API case study to see Copilot discover and call an order-placement API, including the prompts, stock rejection, successful response, and C# implementation.
Troubleshooting
Open the symptom that matches what you see.
MCP: Add Server is missing, or my menus look different
Open the Command Palette in VS Code—not a terminal—and search for MCP. Check that VS Code and GitHub Copilot are up to date and that you are signed in. In versions with the customization editor, use Chat: Open Customizations → MCP Servers. The options depend on the selected Copilot session and organization settings; ask your administrator if MCP is restricted. VS Code server management.
I cannot sign in, or the server returns HTTP 401
Confirm the Instance URL and that Microsoft GitHub Copilot is enabled in that environment. Choose the Microsoft work account that can access it; being signed in to GitHub alone is not enough. Complete any pending Authenticate prompt. If it still fails, open MCP: List Servers → your server → Show Output and investigate the latest error before retrying. Microsoft’s authentication FAQ.
The output shows warnings or “Waiting for server to respond”
My startup log showed authentication-metadata warnings and waiting messages before it eventually discovered tools. An earlier warning alone does not tell you whether startup ultimately failed. Finish any pending sign-in, check the latest status, and test a read-only request.
If the server remains stuck, use Show Output to check the endpoint, network access, and authentication error. After fixing the cause, restart the server. Do not treat a persistent error as harmless because the screenshot later succeeded. VS Code troubleshooting.
The server is running, but Copilot cannot see or use its tools
Open Tools → Connected Sources and check that the intended server is enabled. Confirm the current workspace, configuration destination, and selected Copilot session. A server configured for another agent harness may not be available here. Check its output, restart after configuration changes, and retry the read-only prompt with the server’s name.
I see duplicate servers, or Copilot uses the wrong environment
Open the server’s Show Configuration action and compare its URL with Power Apps Session details. For one environment, keep one clearly named connection enabled for the test. Disable the duplicate in the server controls rather than repeatedly adding new entries.
For multiple environments, use separate names such as Dataverse-Dev and Dataverse-Test, each with its own URL. Name the intended server in your prompt and check the server shown on the tool call. Microsoft’s multiple-environment guidance.
My tool list or table count differs from the screenshots
Use your connected server’s list as the reference. Tools can change between releases, and access depends on your environment and permissions. Older tutorials may mention list_tables or describe_table; Microsoft now documents describe in their place. search finds metadata, while search_data searches data and requires Dataverse search to be enabled. Microsoft’s tool FAQ.
A missing invoke_api tool is separate from a Custom API that cannot be found. Check the server’s available tools first; for API discovery and invocation, see the case study’s troubleshooting section.
I connected, but a table or operation is unavailable
Check the signed-in user’s Dataverse privileges and confirm the environment. Enabling the MCP client does not grant table permissions. Use the returned error to identify whether the problem is access, a missing table, or an unavailable operation. Dataverse permissions.
Should I use /api/mcp or /api/mcp_preview?
Use /api/mcp for this guide. /api/mcp_preview exposes additional preview tools and requires the preview setting to be enabled. Choose it only when following a specific preview feature’s instructions. Endpoint differences.
Is this the GitHub MCP server or the Power Platform CLI MCP server?
This connection targets Microsoft’s hosted Dataverse server for your environment. GitHub’s MCP server works with GitHub resources; Power Platform CLI has its own MCP setup. You do not need to configure either of those to follow this guide.
Where to go next
- Explore Custom APIs. Follow the Copilot discovery and invocation case study.
- Work with a Dataverse query. Use the FetchXML workspace to inspect a query and prepare its Web API URL.
- Compare configurations. Use the text comparer to review changes before updating an existing file.
The interactive walkthrough above reconstructs the setup with example environment details. Use Chapters to jump to a step, or Settings → Sign-in appears to see authentication during setup or on the first chat request. It does not connect to your environment.
Terms in this article
- Microsoft Dataverse
The data platform behind these Power Platform applications. It stores business records in tables and applies permissions and server-side business logic.
- Model Context Protocol (MCP)
A standard way for an AI application to connect to external tools and context. Here, GitHub Copilot is the client and Microsoft’s Dataverse MCP server exposes the environment’s available tools.
- Client allowlist
The environment setting that permits particular MCP clients, such as GitHub Copilot, to connect. It does not grant the signed-in user extra permissions to Dataverse records.
- Instance URL
The base address of your Dataverse environment, such as https://contoso.crm.dynamics.com. Copy it from Power Apps Session details; it is not a link to an individual app or record.
- Endpoint
The address a client connects to. In this setup, the environment’s instance URL plus /api/mcp is the MCP endpoint; /api/data/v9.2 is a different endpoint for the Dataverse Web API.
- Global scope
A connection available across projects for the selected user profile or agent setup. Its configuration location depends on the client and destination you choose.
- Workspace scope
A connection configured for the project or workspace you currently have open. Copilot uses a project-root .mcp.json; the VS Code format uses .vscode/mcp.json. Keep the format that matches your chosen destination.
- Agent harness
The software that runs an agent session and manages its tools, configuration, and approvals. Different harnesses in VS Code can use different MCP configuration formats and destinations.
- Agent mode
A Copilot chat mode that can use enabled tools to carry out a task, subject to the client’s permissions and approvals. Availability of a tool does not by itself authorize a write.
- Metadata
Information describing the available tables, columns, relationships, or API inputs and outputs. Reading metadata describes how data is organized; it is different from reading or changing business records.